Important Note: I am not an authority on MailChimp and am very new myself to the program. If I can clarify or add any additional tips, please let me know. {There is a referral link within the post. With a paid account, we will both be awarded MonkeyRewards.}
I made a goal for the blog to start an email newsletter for all of you, an easier way to keep track of all the recipes, crafts, and other tips. It took me many hours and lots of articles to get it all figured out, so I wanted to share that knowledge with all of you in hopes that you will have an easier time establishing your MailChimp blog newsletter. I have been very happy with MailChimp so far! It is free to 2000 subscribers, though there are some added features with the paid account.
In this post (part 2), I am walking through the set up and design aspect of the email campaigns. In part 1, I walked through establishing the sign up form and the different update options, such as daily, weekly, and monthly newsletter updates.
For MailChimp, a campaign is the scheduled email newsletter that will go out to an assigned segment of your subscribers. I have 3 main campaigns set up to automatically go out to my subscribers based on their choice of email update. In the last post, I explained how to set up multiple update options, such as my three choices of DAILY, WEEKLY, and MONTHLY. If you are interested in learning how to set that up, you should definitely read PART 1 first before setting up your campaigns.
If your campaigns are set up correctly, you should not have to do anything else with them except update the design as you please. They will go out automatically without you having to keep track.
STEP 1: Subscribe to each of your options with a unique email address
MailChimp would not let me create a campaign if no one was subscribed. Therefore, I used my multiple email addresses to sign up for each option. If you don’t have a ridiculous number of email addresses like I do, ask your significant other or mom or roommate to help you. You will need to be able to get into the email account to confirm subscription or have them ready to do so.
This is also really helpful because it will allow you to do a test at the end.
Step 2: Choosing Campaign Format
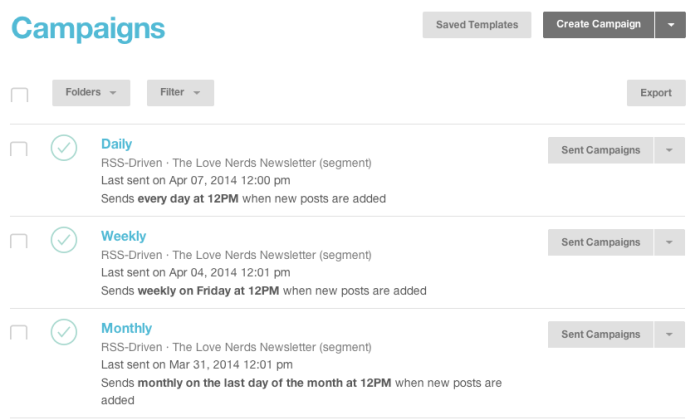
Go to CAMPAIGNS on the left hand menu bar. You will come to this screen where you can see my 3 constant campaigns listed. Click on CREATE CAMPAIGN in the top right. To have newsletters pull your recent posts to share, you need to choose RSS-DRIVEN CAMPAIGN.
Step 3: Set Up RSS Feed
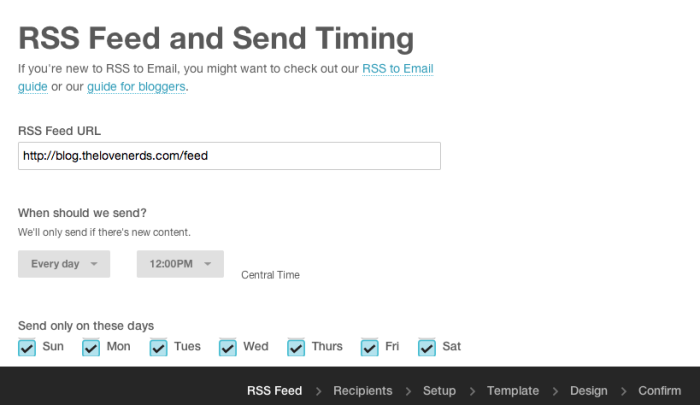
Decide which campaign you are going to set up first. For this example, let’s work with my DAILY campaign. You will need to enter your RSS Feed URL. If you do not know it, MailChimp will help you find it. Don’t worry! Since this is daily, I have chosen everyday and am currently sending it at noon.
Step 4: Assign Recipients
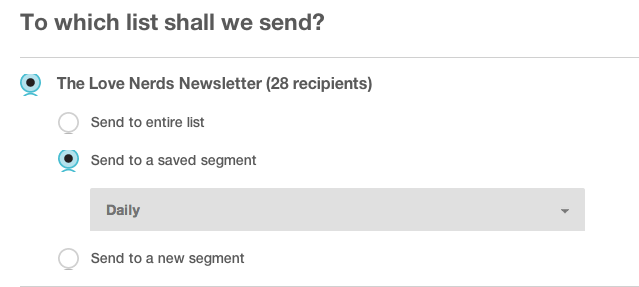
After pressing next, you will be taken to RECIPIENTS. For the DAILY Segment, it should look like below.
Step 5: Set Up
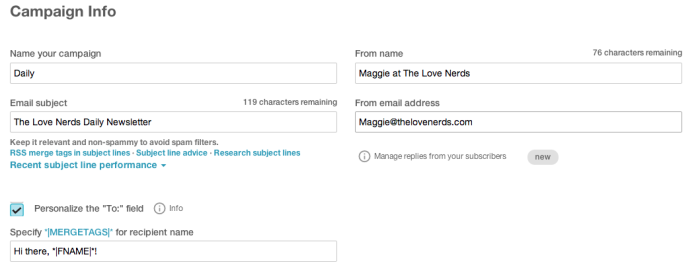
Just like in naming segments, no one will see your name for this campaign. Keep it simple, like DAILY.
Under EMAIL SUBJECT, you have the opportunity to get tips and a little keyword research. I have not done much research yet into email subject lines, so I am not an authority. I am still learning about this process through trial and error.
I have recently implemented a personalized “to” field. I haven’t seen if this will make a difference, but the logic behind it is that newsletters are less likely to go to spam if the “to” field is personalized. To do this, you need to ask for a first name on the sign up form.
Also on this SET UP page is a section on tracking, which I recommend doing. I have the first 3 checked.
Under SOCIAL MEDIA, I have only selected the Twitter and FB option for the WEEKLY campaign. Since I normally update these platforms daily, I didn’t want to flood them with daily updates. A weekly summary seemed like a strong idea, though.
Under MORE OPTIONS, make sure the AUTHENTICATE CAMPAIGN option is chosen.
Step 6: Choose a Template
When I was doing this, I didn’t have the time to truly look through all THEMES that were available. There could be great options in there. However, I chose BASIC which would allow me to work from a blank slate.
When you choose BASIC, you will then be asked to choose an overall format in regards to columns.
Step 7: Design the Layout
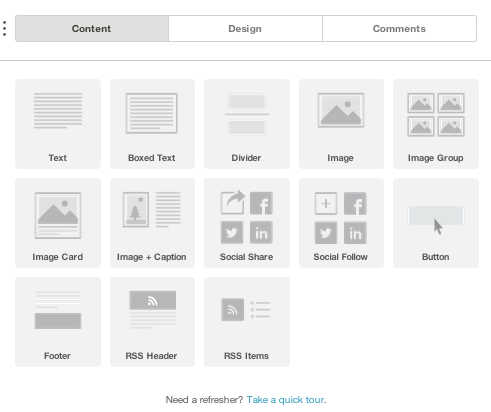
Your main menu for designing your layout will be a series of widgets that you can drag into sections of the newsletter template. For example, you can click and drag IMAGE into your sidebar column to include a headshot of you.
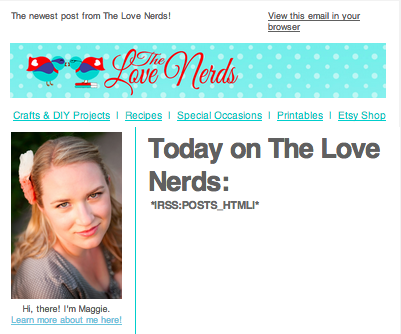
The best advice I have for this section is just to play around and see what you like. I know that my newsletter is not complete. I felt a little lost about what I should include, so I am paying closer attention to other newsletters. Here is what I have included so far: a header that matches my blog design, a header with links back to my main categories on the blog, like recipe and crafts, a photo of myself, a greeting with a link back to my blog’s about me section if they want to learn more, a few key social media icons for connecting, and some items from my Etsy shop.
Step 8: Getting it to work!
This is the most important step for getting the newsletter to accurately pull your latest posts. In the main content section of your newsletter, you need to put the following merge tag: *|RSS:POSTS_HTML|*. You will see I added a heading before hand to title all of my newsletters, but I otherwise have nothing else in my content.
This merge tag will pull all the posts that has been posted since your last email campaign. It will also only send out an email campaign if there is a new post to send. What this means for daily is that it registers one new post since the day before and it sends that post. For weekly, it registers that there has been 2 or 4 new posts since the last campaign and sends those. So easy!
Step 9: Confirm
The next screen is confirming your newsletter campaign. It will tell you if it noticed any problems and send you to fix them before approving. We just completed daily, so you need to go back and do the others. This is easier though if you want to use a similar template – see below.
Important Notes:
1. You can edit a campaign, but you will only be able to do so in the future by pausing the campaign first. This isn’t a big deal unless you have it scheduled to go out right at that moment.
2. Once you have created a template you are happy with, you don’t have to start from scratch for other campaigns. One way is saving a template. I have not done this yet. Instead, I just replicated my first campaign. I found this the easiest choice in the beginning because it saved ALL of my choices. I just needed to go through and update the relevant items for my WEEKLY or MONTHLY campaigns. You can find the replicate option in the drop down menu from SENT CAMPAIGN. See the picture below.
Step 10: To your WordPress Dashboard
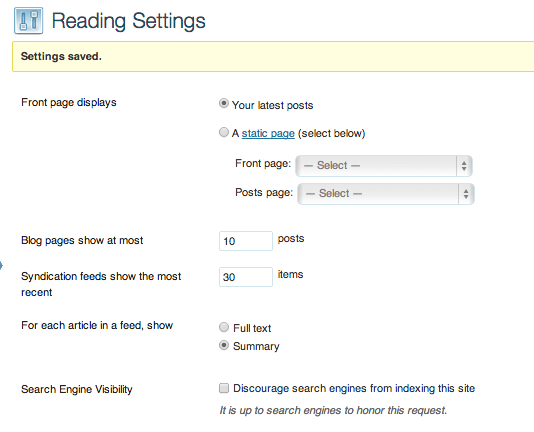
When you are at your dashboard, click SETTINGS on your left hand menu and then READING.
The first thing you will want to address is the “Syndication feeds show the most recent” spot. Select how ever many posts you typically do in a week. For example, while I normally only post 3-5 posts per week, sometimes there can be more if a giveaway begins or it’s the scheduled week for Let’s Mingle Monday. Since I offer a monthly option, I needed to set my number high to account for that campaign. Remember, Mail Chimp only grabs posts that it has not grabbed before.
Here is an example. Say you set your number to 10. If you have only posted 4 times this week since the last weekly update was emailed out, then MailChimp will only grab those 4 news ones. They will NOT grab 10.
Then, you will want to decide between FULL STORY and SUMMARY for your RSS Feed. I suggest SUMMARY for 2 reasons. 1, you don’t want your email to be too long. Imagine getting these 2 MailChimp posts in the newsletter. YIKES! 2, you still want to move people from the newsletter to your blog. Therefore, only giving them an introduction will encourage them to click the READ MORE if they are interested.
Step 11: Test
I encourage you to test all of your campaigns before promoting. Make sure they look the way you want, grab the correct information, etc. For me, I forced a test. Meaning, I paused each campaign, scheduled it to go out as soon as possible, and reviewed the result. If everything was good, then I paused the campaign again to put it back to my desired schedule. (There might be an easier way to do this, but I don’t know it.)
NOTES ON THE TEST:
1. Your weekly or monthly posts may not pull multiples posts since one has never been sent out before. That is okay. This test is also providing a start point for these RSS Feeds.
2. It is possible that the newsletter will not pull an image for the post. If that happens, I recommend the plugin Add featured image to RSS feed. I had to install it to fix this exact problem and it has worked perfectly ever since.
Good luck, everyone! I hope that this helps you reach your own blog goal and that you LOVE MailChimp. I am definitely not an authority, so if you have any additional tips that I can add, please let me know!
What would you love to see in our newsletter?

Leia @ Eat It & Say Yum says
Great tutorial, Maggie! It was so helpful. A few questions, how did you get wordpress to stop sending out emails? Before using mail chimp I was using the built in subscription service through wordpress. (I didn’t even sign up for it, it was already in place and started working on it’s own.) Now I’m worried all my subscribes will be getting duplicate emails. I did change the setting so people can no longer sign up for that.
Also, what widget, or service did you use to get the cute subscription button in your sidebar?
Thanks for all your help! 🙂
katie says
So, I just finished my daily/weekly & monthly campaigns. I have blogger (not wordpress) and just noticed there are not instructions for that – What do I need to do?! 🙂 Thanks! Very anxious to get this started.
Connie Idyllwild says
Such a great post!It’s on the top of my to do list for next week! (this week is all taken up!) BTW I nominated you for the Versatile Blogger Award! Click the link to claim your award!! Just passing the love back around! XOXO http://idyllwilddesigns.com/2014/04/17/versatile-blogger-award/
Joanne T Ferguson says
G’day! Always enjoy learning something new!
Cheers! Joanne